If you’ve read my recommendation on why you should be using Quickbooks Online to help manage your personal finances then your first objective is to get started setting a chart of accounts, and the easiest way to get started is to map your chart of accounts into an Excel file as this is what will be needed for upload into Quickbooks Online (not to be confused with Quickbooks Desktop – eg. Quickbooks Pro, Premier, and Plus variants).
In this article we’ll go through a step-by-step process on how you can import your own chart of accounts into your online Quickbooks account, but before we show you how to import let’s start by removing some of the default chart of accounts Quickbooks has populated into our instance, as knowing this process will also help if we accidentally import accounts we didn’t want.
Why Create Your Own Chart of Accounts?
The reason why you should create your own chart of accounts is that Quickbooks uses common industry accounts depending upon the type of industry you selected when you created your company file.
Some of these accounts you will NOT be able to remove, but the majority you will.
How To Remove Quickbooks’ Default Chart of Accounts
To remove the default set of accounts, simply click on the bolt icon in the upper right-hand of your browser or desktop app and select Chart of Accounts , as shown here:

Once on this page you should see a list of all the accounts available in your Chart of Accounts that Quickbooks have created for you.
For each account you do NOT want, simply click on the drop down icon in the “Action” column and click on “Make inactive”, as shown here:
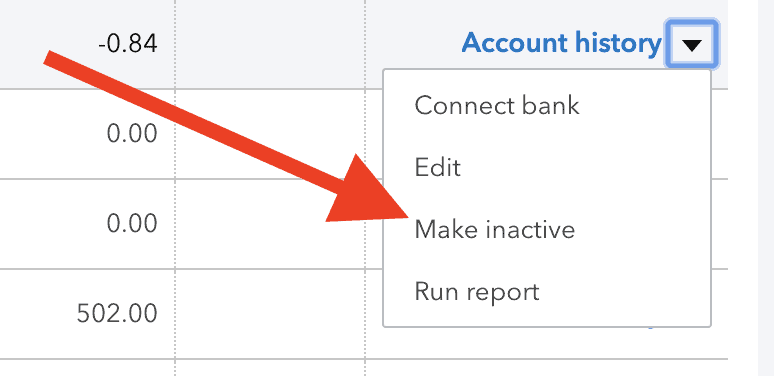
This will not delete the account, but rather make it unavailable for transactions to be posted to it.
How To Undo Inactive Account
If you accidentally make an account inactive and wish to restore an account back to being active again, then scroll to the top of the Chart of Accounts window and click on its gear icon above where you will see all the listing of the accounts. When you click on this icon a small modal window will pop up and you should see a checkbox labelled “ Include inactive “, simply check this box, as shown here:
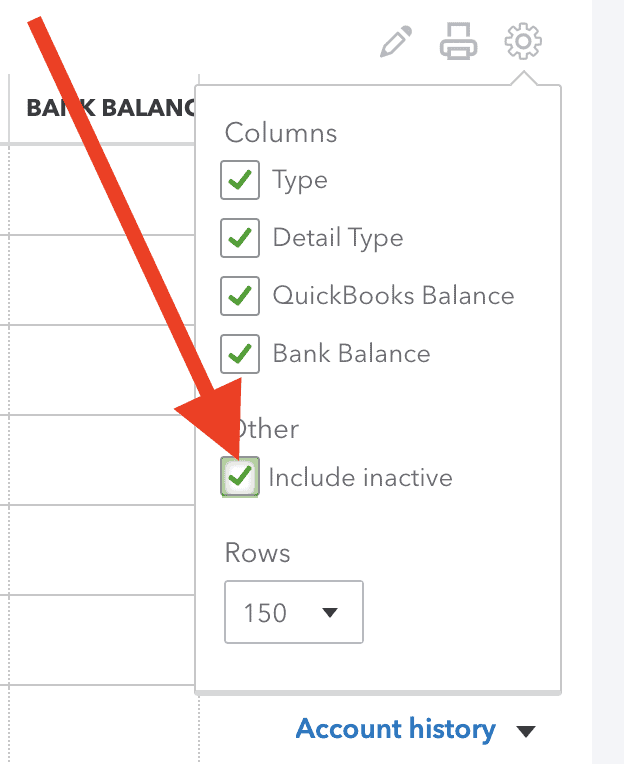
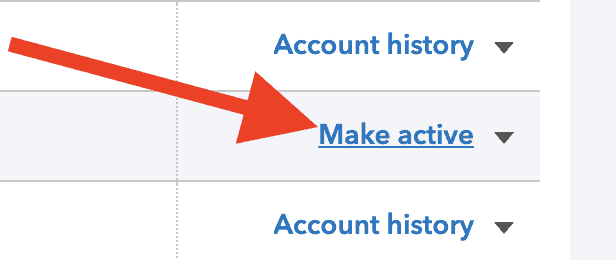
Then when you scan through your Chart of Accounts listing you should see some accounts where, in the Actions column, they have a link labelled Make active . Simply click on this link to restore these accounts in your Chart of Accounts.
Once you’ve finished cleaning out the default Quickbooks accounts its now time for you to be able to create your own accounts and import them through CSV.
Free Quickbooks Online Chart of Accounts Template
To help make this process a little easier for you when you’re creating your own Chart of Accounts for your Quickbooks Online version I have created a Google Sheets template which you can easily copy and use to your own heart’s desire. You can also download the file as an Excel spreadsheet by clicking on File > Download > Microsoft Excel (.xlsx) .
The Google Sheet should help guide you on what is permissible and what you need to be aware of when creating your accounts.
In the header row of each cell you might see a little triangle which when you hover your mouse over pops-out a window which helps to explain whether entries in this column are REQUIRED or OPTIONAL . If a column is optional, its up to you on whether you’d like to include the details.
For example, Account Number is a column which is OPTIONAL , but if used must be unique and have a length of 10 characters or less. Whereas Account Name is a REQUIRED field, and has a different constraint with the maximum length in this field being 300 characters.
The spreadsheet itself will not warn you if you do exceed these limits, so do be mindful of them, or even create your own column that uses the formula:
=len(A2)Which will tell you how many characters are in cell A2, just be sure to delete the column before you export the data as Quickbooks will not accept the file.
One other field you need to be mindful of when creating your accounts is the Detail Type column.
When you create a new account, you need to select an Account Type which is a required field and can easily be selected from the drop down menu in that cell. However, when you move across to the adjacent Select Detail column you need to select a detail which has the Account Type in it.
For example, if I select in the Account Type column Cash and cash equivalents when I move to the Select Detail column I should only select from the following options:
| Cash and cash equivalents > Cash and cash equivalents |
| Cash and cash equivalents > Cash on hand |
| Cash and cash equivalents > Client trust account |
| Cash and cash equivalents > Money Market |
| Cash and cash equivalents > Rents Held in Trust |
| Cash and cash equivalents > Savings |
| Cash and cash equivalents > Transaction |
Notice how each of these options started with the Account Type of Cash and cash equivalents , it is purposefully made so to help prompt you that you should only select these options for the Detail Type .
Again, if you encounter any problems when it comes to actually importing the data into Quickbooks Online, it will likely be due to the fact that you have a mismatch between your Account Type , and it’s corresponding Detail Type .
Lastly, another error that can oftentimes be made, which isn’t obvious, is when creating a sub-account the sub-account needs to have the same Account Type as its parent.
Again, the Google Sheet is only to be used as a guide, it will not help prompt you on any of these errors you have made, therefore, use these steps as a guide should you come across any oblique errors when importing into Quickbooks Online:
- Have I broken any unique constraints that certain fields need (such as the Account Number )?
- Have I broken any length constraints?
- Do I have the right Detail Type for the corresponding Account Type ?
- For sub-accounts do I have the right Account Type ?
Chart of Accounts Import Process
Once you’ve finished creating your Chart of Accounts you will need to download the sheet as a CSV file.
Google Sheets has a nice little nifty feature where you can easily download the active sheet as a csv file. So with the Data sheet active, click on the File menu option up in the top left corner, hover over Download then click on Comma-separated values (.csv, current sheet) .
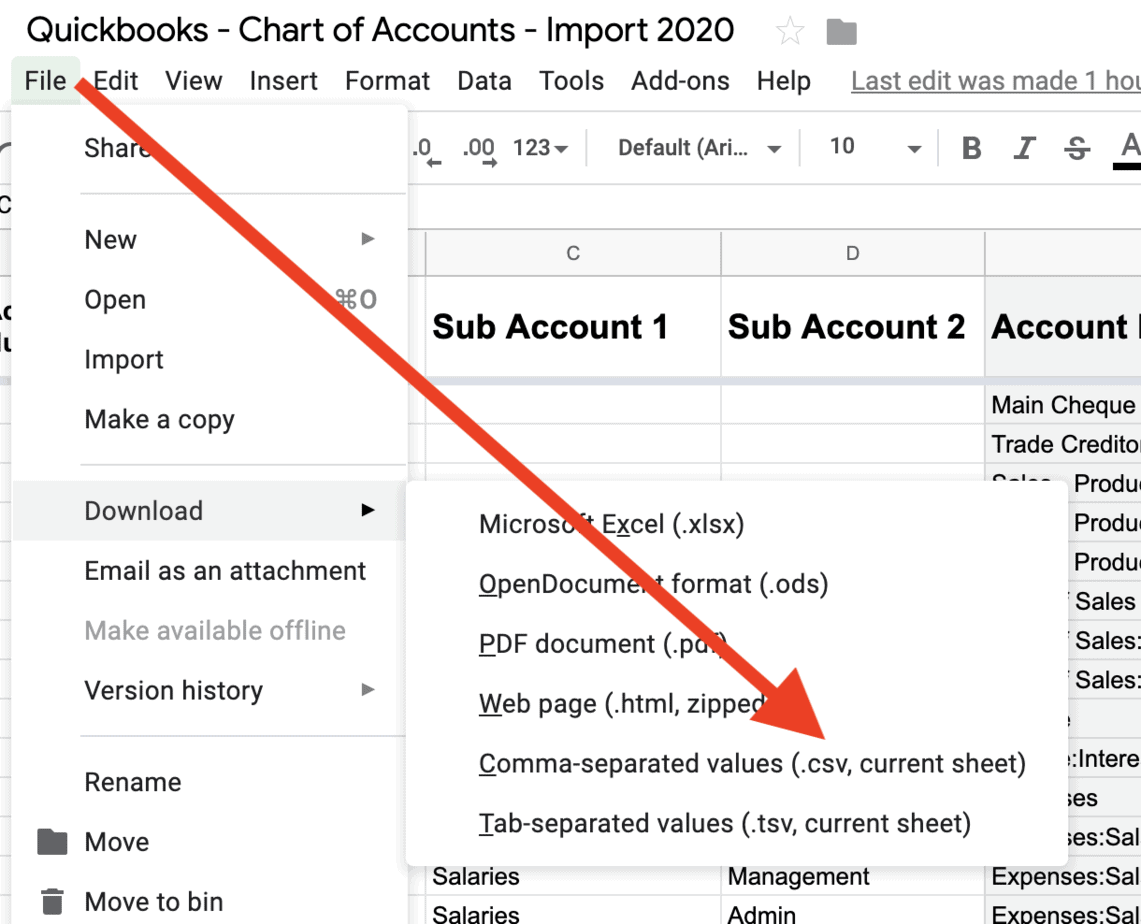
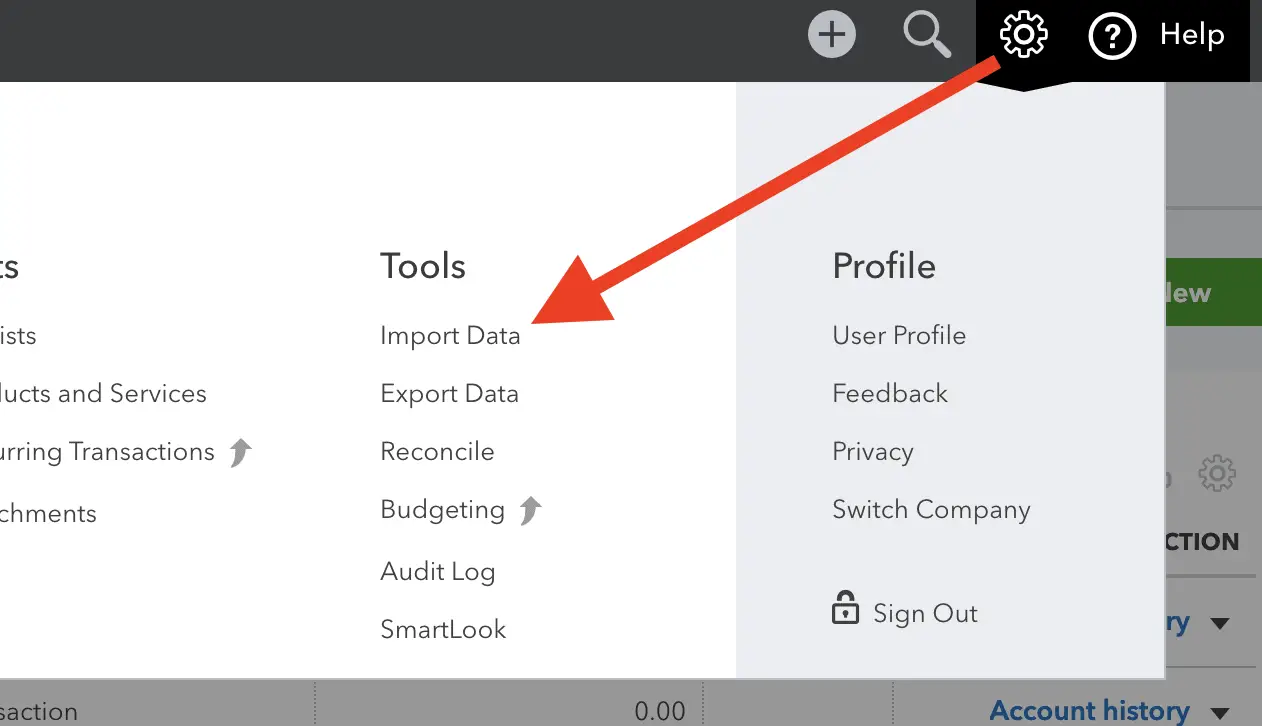
Once you have this CSV file downloaded to your computer, we then hop back into Quickbooks Online, click on the top-right cog icon and then select Import Data , as shown here:
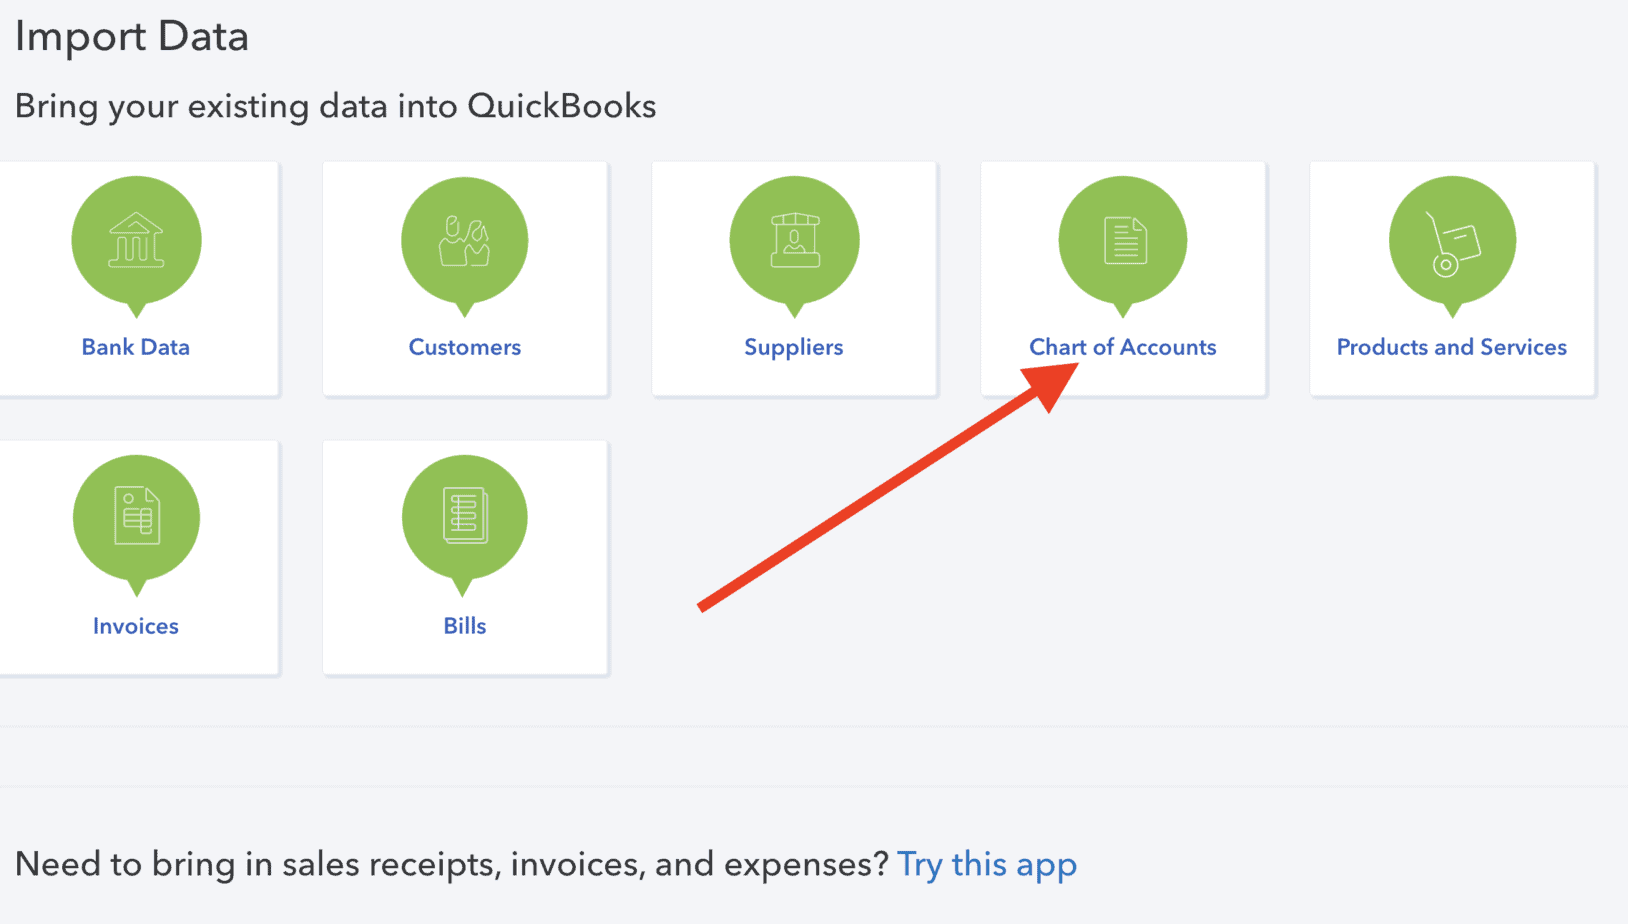
From this next screen you should see an option to import Chart of Accounts data, click on this button:
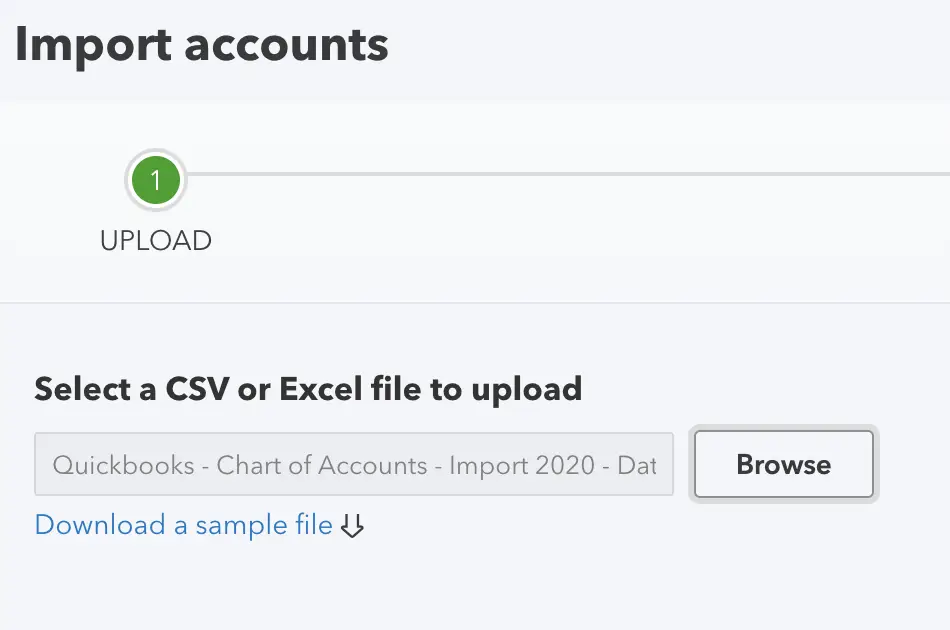
Then simply click on the browse button and select your csv file which you downloaded from Google Sheets.
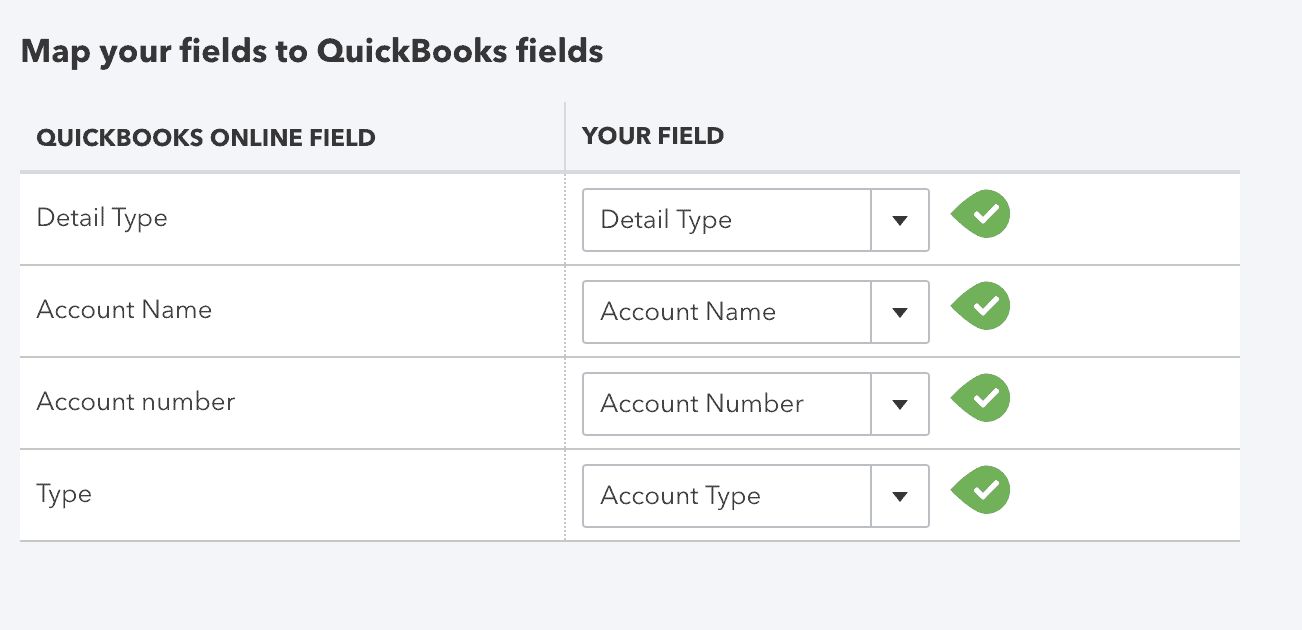
When you then click on the Next button, you will progress to the next screen where you will then see the fields which Quickbooks Online will use to import into the system.
All four fields should have a green tick mark next to them, like so:
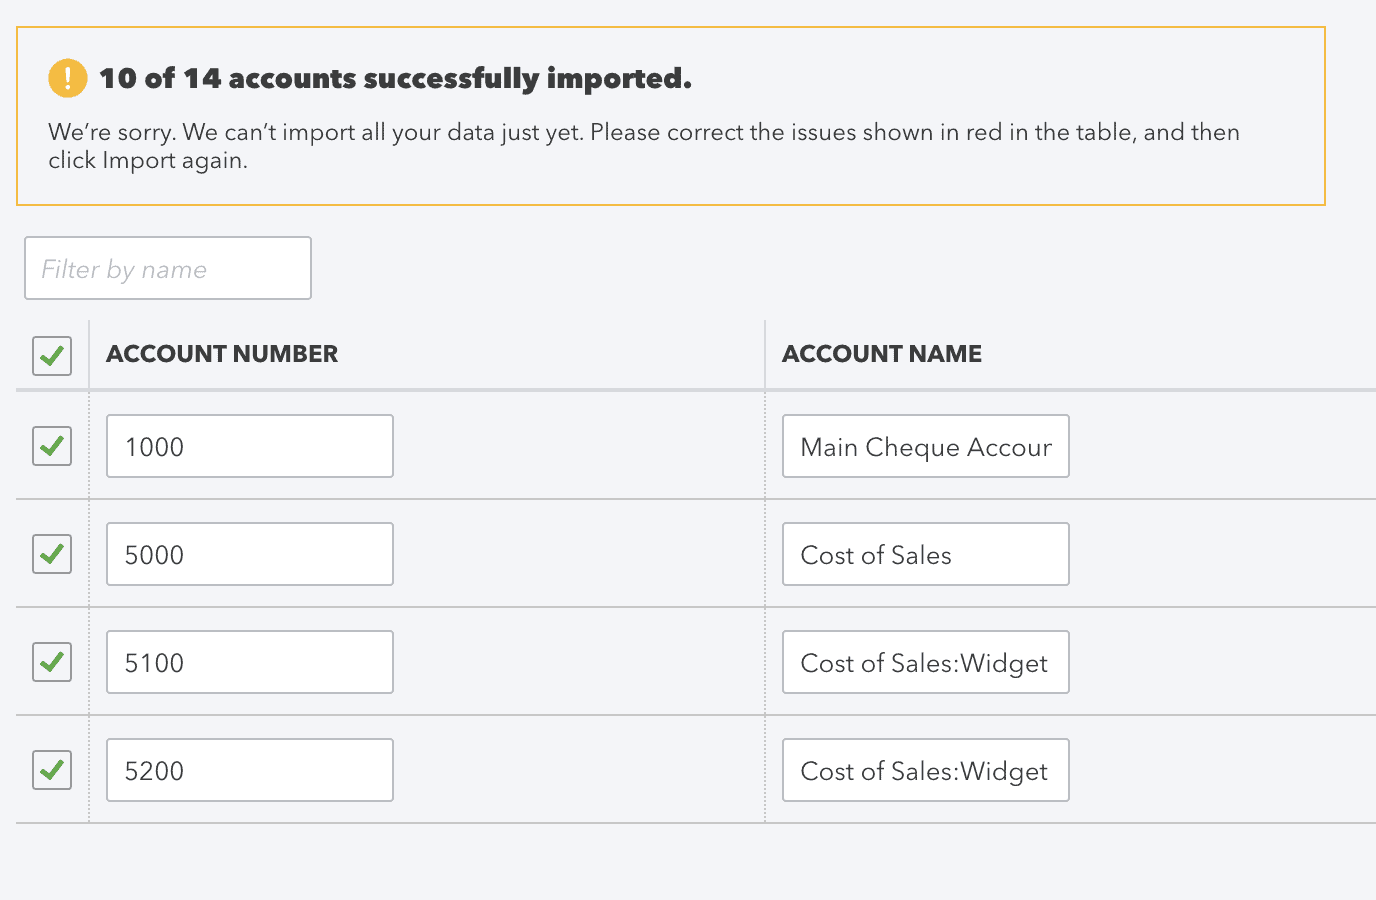
Quickbooks Online will then import your data and on the last screen prior to actually importing your data, you will see if there are any issues with the import, and these items will be highlighted as follows:

When you click on the Import button, Quickbooks will then import your chart of accounts and should there be any additional problems you’ll be prompted along with a list of the accounts with issues.
Conclusion
So there you have it!
You should be able to successfully import a chart of accounts from your Google Sheets and should you need, you can edit your Google Sheets file, re-download the CSV file and then go back through the prompts.
There were times when I forgot a set of accounts, so I just went back to the Google Sheet, added the set, downloaded the sheet as a CSV file, then went back through the prompts. Even though I had already imported the majority of my accounts, going back through the process with the same set of accounts was ignored by Quickbooks Online, and they imported the newfound set I had added.
Anyway, I hope this helps in getting you up and running with your chart of accounts in Quickbooks Online.

